September 25, 2007
Gratuitous Llama Dockyard Blegging
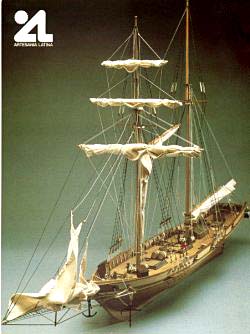
One of the things I've got back into recently is the construction of a model of the "Harvey", a Baltimore clipper built in 1847. I've had the kit for about 18 months now. While I started out strong laying the keel and the bulkheads, I got rayther bogged down in planking the hull. Regular readers will know that this has been a fairly turbulant and distracting year 'round Orgle Manor, so the ship has sat on the stocks for quite some time.
However, as I say, I've been devoting much more time to her lately, the result being that the hull planking (or the first layer, at any rate), is just about done and it will soon be time to start thinking about bulwarks, spill-channels and the like.
That's where the blegging comes in. In this kit, most of the pieces are pre-cut. Nonetheless, they are not pre-formed. The bulwarks, spill-channels and railing are straight. The sides of the hull to which they will attach are curved. My question: how does one curve fairly solid (say 2 or 3 mm thick or so) pieces of wood to make them conform to the shape of the hull? The directions - feebly translated from Italian - are fairly vague. I gather from additional research that one should soak the wood in water. But I don't know things like how long it should soak, whether water temp makes any difference, and whether there is anything else that ought to be added to the water to increase the wood's suppleness. Further, is it best to mount the wood while it is wet or to mold it and then let it dry out first?
Any advice from model/wood-working sharks out there would be greatly appreciated.
Posted by Robert at September 25, 2007 12:56 PM | TrackBackNo help with the wetting aspect - but my recommendation would be to mold it first (and let it dry) then mount it, lest you end up damaging the already built part should the warp you're trying to encourage not take as well as you'd like.
Posted by: beth at September 25, 2007 01:50 PMGuy I knew when I worked at Mystic Seaport in the model shop would build what he called "guys"--wood mold of the contour you were going for, in effect a fake hull for the wet wood strips you were molding to contour to without running into the warping problem beth describes. part of the secret is to work evenly on both sides and from the same direction. if memory serves, too, you are supposed to start from the bottom, but i could be wrong on that as it was 20 years ago.
As for the water temp, the best shot would be to experiment with different temps on the warmer side.
That, and keep your blades really freaking sharpened, and the work area well ventilated. He would die his glue black, so if it did bleed, it could be chalked up as tar pitch, but that was a tad obsessive. but, then again, the whole art is a tad obsessive, in which lies its exquisite beauty.
i for one speak on behalf of the larger llama readership to hear how your progress with this goes:
http://www.ecrater.com/product.php?pid=1138136
Posted by: Steve the LLamabutcher at September 25, 2007 03:25 PMYou might try steaming the pieces. That way they won't be saturated with water. Spent some time around a coopers shop. They use steam to form the staves. If you can bend a white oak stave with steam you can bend about any kind of wood. If your tacking or screwing the pieces in place, you could probably put them on right away as the wood won't be that wet. If using glue it would probably be best to clamp in place till the wood takes form as it cools and drys and then glue.
Posted by: Tbird at September 25, 2007 04:18 PMAs a longtime ship modeler I would say:
Do NOT soak your planks unless you intend to mold them and let them dry thoroughly. Attaching wet planks to the frame will lead to possible frame warping. Then your Harvey will have a corkscrew aspect to it that is not so attractive.
Steaming is fine, but the same applies.
Model Expo sells a number of tools for plank bending. I would heartily reccomend the following. They will keep your heartbreaks to a minimum.
By far, the best tool I've used is the strangely, but aptly, named Plank Planker. Basically, it scores the inside of your plank, bending it into shape according to the area of he ship you're working on. Especially good for shaping those rather difficult areas at the stern. The force and angle of the cut will determine the amount of bend resulting. Care and patience is required. Practice on scraps.
The other thing those poorly translated instructions don't reveal is the art of tapering a plank. In addition to tapering and notching (primarily at the bow and stern), planks should be beveled to facilitate a smooth fit along side another plank. Remember, half the fun of this is replicating naval construction techniques in miniature. For tapering, I recommend the Timber Tapering Tool. Simple and useful. Along with this, you might want to consider a Razor Plane.
I think these tools are a good investment towards a good finished model. If you decide that you're going to get hooked to this hobby, I highly recommend Model Shipways kits. Very complete and detailed instructions. In english. There are some superb kits.
Drop me a line if you've got any more questions. Happy to answer if I can.
Posted by: Chef Mojo at September 25, 2007 05:31 PMHysterical. There was once a young man who promised if I married him to buy me the boat of my dreams - a Friendship sloop. Mr. P, not to be outdone by any failed suitor, presesnted me with a Friendship sloop on our 2nd Christmas.
It was in a box. He bought me a model....and far too complicated for me to put together.
It's still in that box 15 years later. I recently gave it to Little Bertie hoping he'll someday possess enough brainpower to put it together for me.
But in the meantime, for this Christmas I've asked Little Bertie for a woodduck duck decoy with a RC boat engine attached underneath it so he and I can chase all the Canada geese around the lake...
Posted by: Mrs. Peperium at September 25, 2007 06:35 PMHysterical. There was once a young man who promised if I married him to buy me the boat of my dreams - a Friendship sloop. Mr. P, not to be outdone by any failed suitor, presesnted me with a Friendship sloop on our 2nd Christmas.
It was in a box. He bought me a model....and far too complicated for me to put together.
It's still in that box 15 years later. I recently gave it to Little Bertie hoping he'll someday posess enough brainpower to put it together for me.
But in the meantime, for this Christmas I've asked Little Bertie for a woodduck duck decoy with a RC boat engine attached underneath it so he and I can chase all the Canada geese around the lake...
Posted by: Mrs. Peperium at September 25, 2007 06:36 PMI had a friend on board ship (JFK) that built that same model during our Med deployment in '86. He soaked them in warm water until very flexible, took them out a few at a time to let the surface air dry and then superglued the planks in place. The frame was rigid enough that there was no indication of any warping. It probably helped that he worked port then starboard from the keel up rather than all of one side then the other. Me, I started easy with that company's Gokstad long boat.....still have it actually.
Posted by: Mike at September 26, 2007 10:25 AMSoak in room temp or warmer water with up to 10% ammonia cleaner added. Work alternate sides with planks blotted dry, super-glued (cyanoacrylate and baking soda) while temporarily rubber-banded in place followed by air-drying. Works on aircraft nacelles and fuselages as well as hulls. Have fun....
Posted by: The Old Man at September 28, 2007 07:43 PM冷水机 冷水机 密炼机 冷水机 冷水机 冷水机 冷水机 工业冷水机 工业冷水机 工业冷水机 工业冷水机 上海冷水机 上海冷水机 上海冷水机 上海冷水机 昆山冷水机 昆山冷水机 昆山冷水机 昆山冷水机 张家港冷水机 张家港冷水机 张家港冷水机 张家港冷水机 常熟冷水机 常熟冷水机 常熟冷水机 常熟冷水机 吴江冷水机 吴江冷水机 吴江冷水机 吴江冷水机 太仓冷水机 太仓冷水机 太仓冷水机 太仓冷水机 苏州冷水机 苏州冷水机 苏州冷水机 苏州冷水机 无锡冷水机 无锡冷水机 无锡冷水机 无锡冷水机 江阴冷水机 江阴冷水机 江阴冷水机 江阴冷水机 宜兴冷水机 宜兴冷水机 宜兴冷水机 宜兴冷水机 常州冷水机 溧阳冷水机 常州冷水机 溧阳冷水机 常州冷水机 溧阳冷水机 溧阳冷水机 常州冷水机 南京冷水机 南京冷水机 南京冷水机 南京冷水机 杭州冷水机 杭州冷水机 杭州冷水机 杭州冷水机 绍兴冷水机 绍兴冷水机 绍兴冷水机 绍兴冷水机 上虞冷水机 上虞冷水机 上虞冷水机 上虞冷水机 诸暨冷水机 诸暨冷水机 诸暨冷水机 诸暨冷水机 余姚冷水机 余姚冷水机 余姚冷水机 余姚冷水机 慈溪冷水机 慈溪冷水机 慈溪冷水机 慈溪冷水机 宁波冷水机 宁波冷水机 宁波冷水机 宁波冷水机 宁海冷水机 宁海冷水机 宁海冷水机 宁海冷水机 北仑冷水机 北仑冷水机 北仑冷水机 北仑冷水机 温州冷水机 温州冷水机 温州冷水机 温州冷水机 瑞安冷水机 瑞安冷水机 瑞安冷水机 瑞安冷水机 嘉兴冷水机 嘉兴冷水机 嘉兴冷水机 嘉兴冷水机 台州冷水机 台州冷水机 台州冷水机 台州冷水机 青岛冷水机 青岛冷水机 青岛冷水机 青岛冷水机 合肥冷水机 合肥冷水机 合肥冷水机 合肥冷水机 模温机 模温机 模温机 模温机 模温机 上海模温机 上海模温机 上海模温机 上海模温机 昆山模温机 昆山模温机 昆山模温机 昆山模温机 张家港模温机 张家港模温机 张家港模温机 张家港模温机 吴江模温机 吴江模温机 吴江模温机 吴江模温机 常熟模温机 常熟模温机 常熟模温机 常熟模温机 太仓模温机 太仓模温机 太仓模温机 太仓模温机 苏州模温机 苏州模温机 苏州模温机 苏州模温机 模温机 上海模温机 昆山模温机 苏州模温机 南京模温机 模温机 上海模温机 昆山模温机 张家港模温机 常熟模温机 太仓模温机 吴江模温机 苏州模温机 无锡模温机 江阴模温机 宜兴模温机 常州模温机 溧阳模温机 镇江模温机 扬州模温机 南京模温机 江苏模温机 南通模温机 浙江模温机 杭州模温机 绍兴模温机 诸暨模温机 上虞模温机 余姚模温机 慈溪模温机 宁海模温机 北仑模温机 宁波模温机 温州模温机 瑞安模温机 乐清模温机 台州模温机 嘉兴模温机 海宁模温机 金华模温机 义乌模温机 哈尔滨模温机 长春模温机 沈阳模温机 大连模温机 北京模温机 天津模温机 石家庄模温机 郑州模温机 济南模温机 青岛模温机 福州模温机 厦门模温机 武汉模温机 长沙模温机 南昌模温机 太原模温机 西安模温机 合肥模温机 芜湖模温机 马鞍山模温机 油温机 上海水温机 水温机 上海油温机 苏州油温机 苏州水温机 无锡水温机 无锡油温机 常州水温机 常州油温机 南京水温机 南京油温机 杭州水温机 杭州油温机 绍兴水温机 绍兴油温机 宁波水温机 宁波油温机 温州水温机 温州油温机 嘉兴水温机 嘉兴油温机 台州水温机 台州油温机
Posted by: njracks at July 7, 2008 12:40 AMAbstract paintings
Angel painting
animal paintings
ballet paintings
beach painting
Boat painting
building painting
Children painting
Christ painting
church painting
City painting
Cottage painting
Dancer painting
field painting
Floral paintings
Garden painting
Hunting paintings
impressionist painting
Knight painting
Lady painting
Landscape painting
Lighthouse paintings
Music painting
Nude painting
Oriental paintings
Piano painting
Seascapes paintings
Still Life paintings
street painting
sunset painting
Tropical paintings
Venice paintings
Village painting
wine painting


 Image courtesy of the lovely and talented